The ancient yoga of Niguma has historically been a secret tradition—and it is known to be extraordinarily transcendent. In addition to offering the many benefits one would also receive through hatha yoga, this practice cultivates the subtle channels of the inner body and refines the energetic winds that flow within them. In this way, we clear internal obstacles, restore energetic circulation, and attain health through balance. Ultimately, the practitioner restores the power of one’s most concentrated essence and gradually gains masterful yet gentle control of its internal movement. The fruits of the practice offer utmost clarity in one’s own mind and exquisite, auspicious discernment in one’s life.
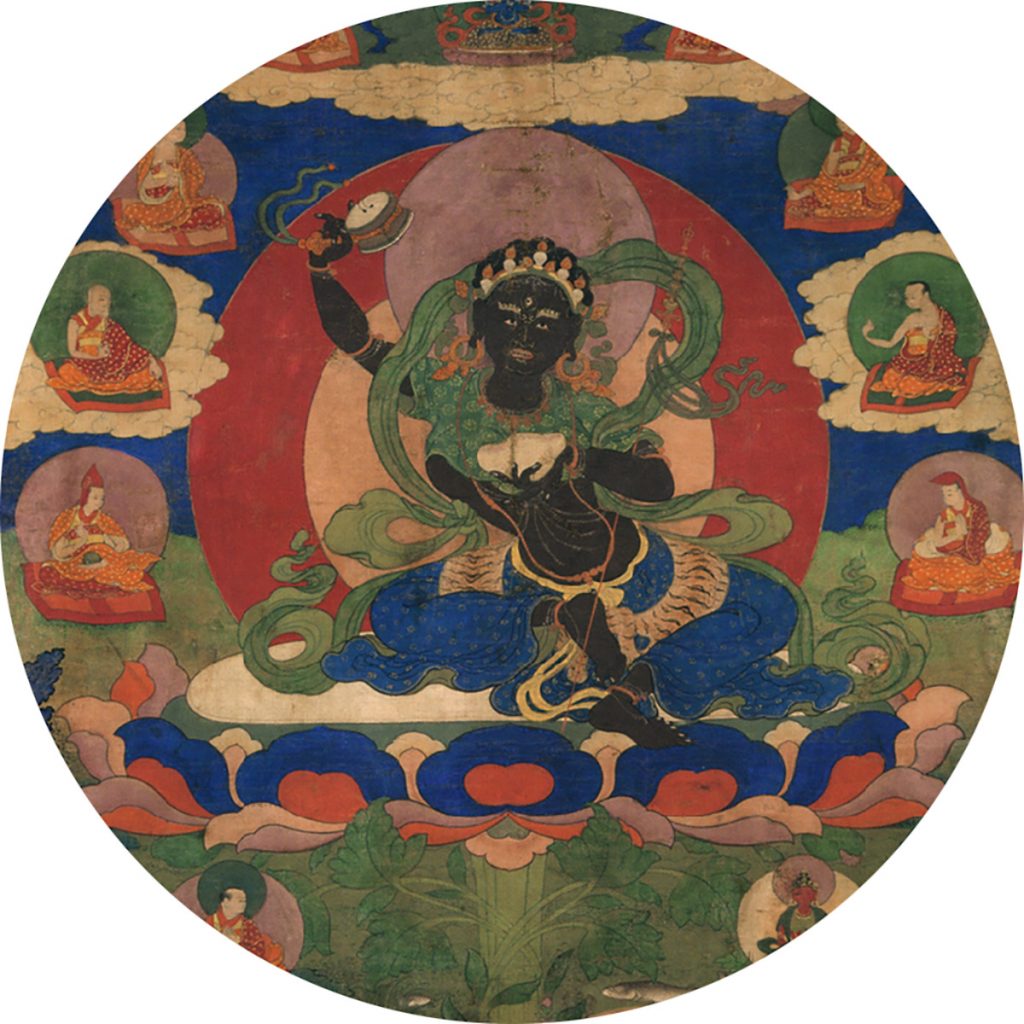
Niguma’s teachings and yogic methods are revered by the oldest traditions of many Vajrayana schools throughout the Himalayan region, and they are studied and practiced by scholars and meditators alike. Niguma was an exquisitely enlightened yogini who brought us this yogic tradition a thousand years ago. Many masters at that time acknowledged that the level of her realization was comparable to that of the Buddha himself.
Niguma asked her first student to promise not to allow her secret treasures to be shared with the public until seven generations had passed, and only then with precise and proper explanation. As per her condition, the first seven generations of practitioners carried out this tradition in strict secrecy. Then, once it became accessible, many Buddhist schools absorbed this tradition in earnest. Still, the yoga of Niguma remained closely held and taught only to dedicated monks during the latter part of a three-year secluded retreat.
Eventually, the previous Kalu Rinpoche began teaching lujong according to the lineage of Niguma—a series of yogic practices that combine movement, breathing, and awareness, the fruit of which is physical health, emotional balance, and spiritual awakening. Based on my own intense inspiration during retreat, and as a dedicated Buddhist practitioner, I was moved to follow in the footsteps of my predecessor, the previous Kalu Rinpoche, and decided to make the yoga of Niguma more accessible to the public. It is my hope and vision that sharing Niguma’s teachings will offer great benefit for generations to come.
Niguma yoga includes a sequence of twenty-five physical sets of actions. Usually, when this is taught in a Buddhist context, a practitioner will take up traditional teachings and put them into practice. The teachings of Niguma are very beautiful, very simple, and very profound, while also being readily understandable. These attributes reflect the wisdom of the teachings.
The yoga of Niguma is primarily a breathing practice for transformation. By focusing on the breath again and again as you inhale, exhale, and keep the air retained, heat and bliss are generated. And, after a while, the mind becomes less fixated on sense objects, emotions, and physical sensations, and one enters the middle state of mind, which is a state of inner peace and equanimity.
The practices described below will help you develop the foundational postures and breathing that are core to Niguma yoga, including how to build the vase breath and hatha yoga breathing practices that can provide additional support.
Foundational Vajra Posture and Breathing
The posture in which we begin and end all exercises is the vajra posture, also called full lotus, or padmasana. You can alternatively sit in a loose cross-legged position on the floor or with ankles crossed sitting on the edge of a chair with your spine straight.
Extend your arms so they are straight and place your hands on your knees. The back should be straight but also relaxed. The mind begins to settle into meditative awareness as you begin to notice your breath. Spend a few minutes relaxing into awareness. Allow any distracted thoughts and projections to dissolve away. Tell yourself, “Everything is impermanent, and therefore everything is perfect.” Invite desire, fear, anger, or anything else that is clouding your mind to begin to float away into a clear sky of spacious awareness.
Breathe in and out through the nose throughout your practice. In between each pose that follows, come back into this foundational meditative posture and take at least three breaths. Focus on the gap, or pause, at the end of each exhale to further relax the body and mind.
Vajra Fists
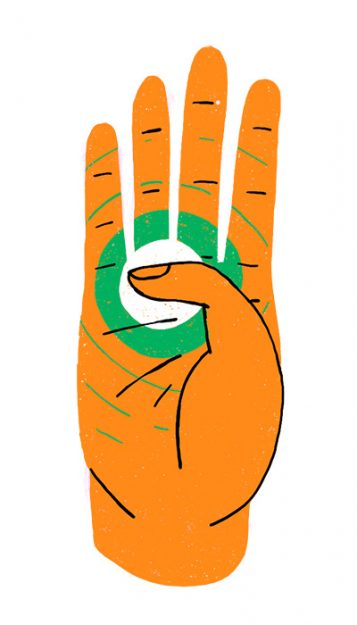
When breathing in, the hands form a “vajra fist.” Place the tip of each thumb at the base of the ring finger and close the hands into a fist. This hand position calms and focuses the mind and is said to reduce ignorance. It also protects and concentrates our vital energy inside the body and keeps negative energy from entering.
As the mind stills, we have a greater ability to hold a longer vase breath (see below), which brings more clarity and transformational wisdom energy. While breathing out, open the hands in a relaxed way. The hands follow the flow of the breath.
Arrow Breath
In preparation for each exercise, take three breaths through the nose, opening and closing the hands with each breath. On the third exhale, perform a strong arrow breath. The arrow breath starts with a smooth exhale out the nose, like an arrow gliding through the air, then, at the last moment, the exhalation comes out forcefully and audibly, like an arrow hitting its target. This forced exhale through the nose removes dead air, toxins, and tension, and creates an engagement and muscular toning of the pubococcygeus muscles at the center of the pelvic floor and the transversus abdominis in the lower abdominal region. This muscular toning is important for creating the fuller diaphragmatic vase breath that will soon follow. It also begins to pull up the lower wind energy toward the navel, which is important for cultivating heat and creating an experience of bliss. At the bottom of the arrow breath, open your hands so the fingers are outstretched. This is followed by a vase breath.
Vase Breath

Vase breathing (Skt.: kumbhaka; Tib.: bumpachen) is a technique that fills the pot of the belly, like filling a water vase from the base up to the narrow open top. The breath is most fully concentrated in the widest part of the container in the belly, and it is held there to increase and stabilize one’s vital energies, or inner subtle winds (Skt.: vayu; Tib.: lung).
At the end of the arrow breath, take a very quick half-second-long yet fully diaphragmatic inbreath to fill your belly and torso with air. The quick nature of this breath keeps you from taking the breath too high into the upper chest. The breath should stop about the level of the heart. The belly and torso are expanded in all directions, up to the top of the diaphragm. Once established, slightly pull up the pelvic floor muscles to create a lift below the vase and then press down from the top of the diaphragm or heart toward the navel to create a more expansive vase. It can help to swallow a little when you are first learning to press down from above. This quick breath, and the action of drawing up and pushing down, concentrates the wind energies into the pot of the belly around the level of our navel, where it should be held. Over time, it will become more refined and easier to hold.
Taking the breath up too high can create dizziness and too much wind energy. When pulling up the pelvic floor, try not to contract the belly muscles near the navel. The lowest belly muscles, four finger-widths below the navel, can simultaneously contract with the perineum muscles but nothing higher.
As you are performing an exercise, if the vase breath begins to lessen, you can top it off with another quick puff of breath to return the fullness to your vase.
Over time, with practice, the vase breath retention will be more comfortable to hold for longer periods. One should be relaxed, so don’t force yourself to hold the breath longer than you’re ready for.
Upon completing a pose, one returns to a crossed-legged position, with hands on the knees, and exhales forcefully with a quick arrow breath. This happens with the breath and hands in sync with one another. As the breath shoots out, the vajra fists land on the knees. As the arrow breath lands, the fingers fully extend out. The thumbs remain at the base of each ring finger. Hold the exhalation out as comfortably and long as possible to calm the nervous system. When the inhalation arises, close the vajra fists. When exhaling, open the palms and fingers. Focus on the pauses between each breath and the mind’s luminosity and clarity.
Supporting Practices
As you begin your journey with the yoga of Niguma, it is important to understand how to breathe correctly and access the muscles we use to create a full vase breath. Aligned breathing is the most powerful medicine for longevity and restores our physical health and happiness, and can elevate us to higher levels of consciousness. Practice the foundational breathing techniques below to have a deeper understanding of how to breathe, relax, and build your capacity to perform a vase breath.
Constructive Rest Pose
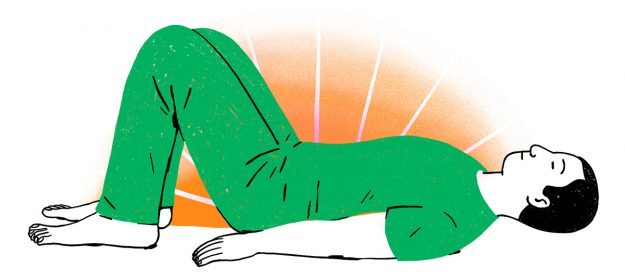
The constructive rest pose is powerful for relaxation and cultivating intimacy with the symphony of muscles in your body that work together to take a full diaphragmatic breath, which is essential for being able to do the vase breath in Niguma yoga. As you practice constructive rest pose, stay present for these natural contractions that occur as you observe the ends of the breath.
- Lie down on your back, with your legs bent to ninety degrees and your arms by your side. You can march the legs up and down a few times, until the feet and knees land on the ground just right for you. The lower back should have a natural soft curve; don’t try to make it flat.
- Place your hands on your belly to begin to feel the rise and fall of your natural breath. Allow your belly to simply expand as you inhale and fall back toward the earth as you exhale. Stay present for the complete length of your inhalation. Stay present for the full extension of your exhalation. Notice the tone that takes place in the lower belly and base of your spine as you complete each breath cycle.
- Stay for five to ten minutes, and remain completely absorbed in your breathing process and the sensations that arise with the breath movement. As you continue to be present for each breath, become familiar with the luminosity of mind and relaxation response that accompanies this witnessing. Mind and breath go together. When we find space and a soft fluidity in our breathing, our mind aligns and becomes spacious awareness.
If you are carrying stress or have back tightness or pain, focus on letting your belly expand on each inhalation and your lower back releasing toward the ground on each exhalation. Your lower back will softly begin to move toward the ground as you relax. Let this happen naturally with the breath without trying to press the back down. Rather, just witness how the breath’s natural wave patterns will create the shift.
Notice the sensations in the body as your breath flows in and reaches the upper crest of the wave. Notice the gaps between each breath and the gaps in thought, just spacious presence that happens in the space between each breath. Just by tuning in, we begin to connect the upper and lower wind energies as relational, not truly in opposition but rising out of each other. We can experience a feeling of emptiness at the bottom of the exhalation and boundlessness at the top of the inhalation. These are, in fact, two ends of the same stick, and although they produce different sensations and appear uniquely, they are eventually seen as part of an interconnected whole.
Seated Yoga Breathing for Diaphragmatic Awareness
Take a comfortable cross-legged seat on the ground or edge of a chair. Use elevation as needed to allow your pelvis to be neutral and your spine to lengthen. Align your pelvic floor with your palate and the center of your head. Keeping a straight spine, practice deep breaths, allowing your belly to expand to the sides and fill the belly like a balloon. Create as much space without creating tension from your efforts. Fill from the top of the belly down to the pelvic floor and let your lower side ribs move out while you expand your abdomen. After several rounds of full breath, imagine that you are equally filling a vase with fluid from the base up. Then, keenly become aware of the ends of the breath. You might notice the pelvic floor relax down at the top of your inhalation, and contract in and up at the bottom of your exhalation. Stay present with the ends of the breath and the sensations that arise in these gaps between inhaling and exhaling. Perform three, seven, fourteen, or twenty-one rounds.
Viloma Pranayama
Viloma means cutting or snipping hair in Sanskrit. Here, you cut the torso into three or four parts, sometimes more, and breathe in, pause, breathe in a little more, pause, and then a little more, and so on. You can practice it as you move the inhalation up, and it can be also practiced as you are exhaling down.
Viloma pranayama can be done sitting or lying down in constructive rest pose, or lying down on the ground supine, with legs outstretched and with a bolster supporting the length of the back and head in what is called savasana 2 (corpse pose with bolster) position. Here, the torso is divided into three parts, but you can do more.
- Breathe into the lower belly, then stop. Hold for a few seconds.
- Add a little more and breathe into the upper belly, then stop. Hold for a few seconds.
- Add a little more and breathe into the chest, then stop. Hold for a few seconds, and then breathe all the way out.
Pranayama Utilizing 1:2 Ratio
To support our ability to extend our exhalations, I suggest we train with a technique I learned from the wonderful Kaivalyadhama lineage of pranayama masters who have done leading research on the benefits of pranayama and cultivating a 1:2 ratio of inhalation to exhalation when practicing pranayama.
An example of 1:2 ratio would be to inhale for five counts and exhale for ten. If that is too difficult, reduce to a four-count inhalation and eight-count exhalation, or fewer. This can be done when practicing alternating nostril breathing (nadi shodhana), other pranayama exercises, or just simply while doing deep diaphragmatic breathing. Strengthening the capacity to extend the exhalation will help you to be more grounded as well.
- Sit with your spine straight in meditation posture and place the tip of your tongue at the root of your upper front teeth. Draw up the perineum gently and take the gaze down the nose softly. Relax your chin toward your heart and lift your heart toward your chin.
- Inhale and take a vase breath for four or five counts. Exhale for eight or ten counts.
- Pay particular attention to the natural gap at the bottom of your exhalation and the natural gap at the top of your inhalation. Increase the length of the breath and the ratio as you become more adept at breathing out in a relaxed way.
♦
Adapted from The Yoga of Niguma: Tibetan Practices for a Luminous Mind by Kalu Rinpoche with Michele Loew © 2025. Reprinted by arrangement with Wisdom Publications.
Thank you for subscribing to Tricycle! As a nonprofit, we depend on readers like you to keep Buddhist teachings and practices widely available.